Custom Fighters - Custom Streetfighter Motorcycle Forum banner

ninja 250 fighter

1 reading
115K views 126 replies 30 participants last post by  Bskicrash1  
#1 ·
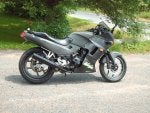
Here is what the bike began as
My commute bike. It's been painted again since this picture was taken.

DAY 1

Today I took the two mufflers off... the headache began.

I rode the bike with just the straight H headers (which dump underneath my pegs) after 5 minutes i had a headache from the raspy tone of the exhaust... sorta like a wet high pitched squeel. I added a thumbscrew at the end of my header pipes on both exhaust headers to deflect some of the sound waves. It helped... a little bit.

Jetting will be done later.

If this is the setup that i'm going to keep for the exhaust... then i'll make sure the headers and dumps look much nicer... but for now, I will continue with my commute


1. Took off both mufflers
2. Added resistance in the header pipes using 'thumbscrews'
3. Had to remove the bikes center stand (the mufflers stopped it from binding up the chain)
4. Cut the chainguard (from nasty block style to an inspiration of an R1's guard)

Cost= $1.38 for thumbscrews, lock washers and bolts from tractor supply
Time= 1.5 hours with test riding.
Weight reduction= 25-30 pounds (12-15 pounds per muffler, 5 pounds for the center stand, .02 ounces for the safety plastic cut from the chain guard)

Thats the chain guard.. which became very much visable without the muffler covering it up... so I had to chop it up


Thats the center stand, and two mufflers that I dropped from the rear


the subframe is next...
 
#2 ·
Good start :D weight reduction. Next best thing is to cut that tail section off and fab up a new one, maybe get rid of all pointless things like pillion pegs (if you don't carry a pillion). But the bike looks clean, no damage or rust COOL!!
 
  • Like
Reactions: Bskicrash1
#3 ·
Here is a video of my exhaust as of right now...
http://www.youtube.com/watch?v=p1vaHwyN5rw


DAY 2

Today I cut the subframe up tacked it together with a higher angle'd tail...

stock subframe


from the right side:


Going to have to fiberglass a tail... making a mold is next on the agenda.

I've got the one picture mocked up with the seat on it and the original subframe covers (which don't fit anymore due to the drastic angle of the tail) but i was thinking of using that piece of fairing that is flush with the gas tank that extends to the rearsets... cutting it a bit and then adding fiberglass to it and blend it into the tail section.

what idea's do you have with this mocked up subframe... what kind of tail do you picture?
 
#6 ·
Thats awesome Double Glow... keep a thread of your build... ... blow the mold on the 250... i'm starting from back to front... mainly cosmetic.

what I see in my mind:
Glassed tail (similar in style to the new 250, but tweaked)
dual seat (no bench seat like stock, but two pads instead)
Glassed tank for smooth edges around the seat (no more indent for the bench seat)

Eventually when I get to removing the front fairing
Going to raise the front fender
cyborg style lighting (one big round with one little round)
the tank will be glassed in the front to actually swoop down towards teh radiator)
Belleypan modded/glassed (even debating cutting holes in the bellypan and having the exhaust exit through the bellypan that would be killer)
of course... all new paint job with the body and tank being black.. rims (something that contrasts, gold, or metalic silver or something that seems to fit when the time comes)
Gotta figure out something with the guages (prolly will use the windscreen, but cut/glass it to fit with the headlight and cover the guages... not sure yet)


But, my main goal that i'll be happy with at the moment, getting the exhaust baffled correctly, rejetted, glassed tail and seats for the rear.
I have an LED brake and running light already, its oval, 2 inches by 6 inches with 14 LED's... and two clear turning signals on order from dennis kirk. Gonna make the rear clean, smooth, and narrow.

Then i'll move onto the gas tank and then forward.
 
#8 ·
sweet, yeah i have a build thread : ninjas mask 250 : its called. il be using an r6 or r1 seat custom fabbed to the rear and running the dual seats as well, cuttently mine is stripped down to the tiny tiny frame. I got a zx750 rear shock and ex500 front fork il be putting on sometime soon. Hopefully it will stiffen ther bike upa bit so i dont feel too rediculious (im 6'5 and 240lbs) Also got a new sproket and chain kit coming, up 1 in the front, and up 2 in the rear. Also got K&N pods, jet kit, and hopefully a muzzy 2 to 1 coming by the end of the month. Overall im trying to keep the bike under $500 in parts, including bike purchase price. (i only paid $100) You and I should work together if we need help. Also PM me i have the PDF of the Repair Manual, its been extreely helpful sofar. im really interisted in the gas tank idea, glassing? ive never heard of that...unless you meant fiberglass. I actually like the stock guages, i think they look sporty and really fit the bike considering the bodystyle and age. If you need help just ask man, and good luck! Il be posting LOTS and LOTS of pictures when i really get the ball rolling on my project, i expect the same!
 
#9 ·
If you can get atorch I would notch, heat and bend those lower tubes up to meet the upper tubes, then you could do away with the side panels all together, and the tube frame would be all the same.

250's make excellent fighters once you get the bars and tail taken care of, here is mine. I'm thinking of going the cafe route with it next.
 

Attachments

#10 ·
bought some new materials tonight and mocked em up on the 250...

Here's what I got:

1. new fuel line
2. LED running lamp/Brake light
3. Exhaust piping for the header tips I'm running reducers ( I like the look and it will give some back pressure for the gutless powerband) (not one exhaust/pipe bending automotive place near me had any exhaust pipes less than 1 1/2 inch... and I needed 1 1/4 plus even smaller internal's for baffles... )
4. Fiberglass packing for my homemade baffles
5. Two 2 foot by 3 foot 20 guage sheets of sheet metal (I will use this to create the baffles to fit inside my 1 and 1/4 inch outer diameter header pipes...and for anything else that requires sheet metal, I can never have enough laying around!)


Still waiting on my Front brake pads and clear lens mini turn signals for the tail...
 
#12 ·
5' 10" thats not too bad, the clipons make me look hunkerd down :D

I mean the lower frame tubes in the subframe area. If the tubes were notched on the inside down by the rider peg mounts, then heated, they could be bent up and then welded onto the top frame tubes.
 
#15 ·
Day 3


Built my homemade baffles today... couldn't bend steel to a small enough diameter... so I improvised...

used aluminum instead. Aluminum melts at 1220 degrees F... so this will work...


and the final product...


Time: 30 minutes

Cost: $5 ($1 for two Pepsi's and about $4 for the sheet of fiberglass insulation)

Rob
 
#17 ·
Day 4:

1. Installed the homemade baffles

2. I messed around with some sheet metal in hopes of making a fender and battery box/electrical box...


here's what I came up with


And here is a clip of me starting the bike with the homemade baffles in it... the headers are now about 40% quieter than previously... note... this video was taken in the barn, so the sound is echoing actually sounding louder than it truly is..
http://www.youtube.com/watch?v=8YrLAiqfbjc


Next I will finish the undertail and create my brake light bracket...
 
#20 ·
I notice... its just slung up there for now... I am playing with a few concepts in my head right now... but i'm defenately going to be cutting that and shaping it a tad more... I made the box about 300% too large for the electricals...

I decided to call it quits for the day before I started cutting and chopping the box I made and then mess up... figure if I wait a few days and think about it... something will come to mind...

I like the look of the high freefloating seat... i'm contemplating now If I want to fiberglass a tail or keep the frame exposed...

I'm defenately going to keep things flush and flow.. instead of choppy and nasty... so far the 250 looks better with the open rear end
 
#21 ·
Day 5


Carefully took out the stock air box. This was a pain seeing as how Kawasaki designed it to fit flush against all frame tubes... So I had to split it in half by unscrewing all 9 screws and removing one half of it at a time.


This thing was heavy! (4 pounds rounded!)


Day 6


I decided to remove the stock air box snorkels and take a look at them... I then became creative and decided that I could build my own pod filters out of the stock snorkels.


I had some wire screen laying around (the stuff for your household screens)... I cut up 4 sections large enough to be able to wrap around each snorkel. The wire is strong enough to keep the foam filter from being sucked into the engine. I then sandwiched the foam filter element between two sections of wire screen and then wrapped them around the snorkel...


so the layers are as follows:

1. Snorkel that attaches to carberator
2. Wire screen to keep the foam from being vacuumed into the carberator
3. Foam filter element
4. Wire screen to protect the outside of the filter element from debris etc.


Here is one snorkel finished and one naked!


The pod filters will attach to the carburetor's using hose clamps.


When I removed the airbox... I now have my crankcase breather tube open on one end... I have to pick up a breather filter/breather element for it.


I also found a plastic shower caddy that fit perfectly between my frame tubes. This became my battery tray and electrical box. So all electrical are now nicely organized under my seat in this plastic container. (i'll have a pic next time I go into the barn)


until next post...
Rob
 
#22 ·
Day 7


Today I installed the pod filters I made and cleaned all the electrical's into one location under the seat. This is what it looks like so far

what I have left to do:

Make my tail light braket, turn signal brackets, and wire them into the wire harness.


I would have made more progress today, but yesterday my dirt bike busted a hole in the stator cover... So i had to fix that today. Tomorrow I have a trail ride...
 
#23 ·
Day 7 part II

I went back through the electricals and zip tied loose wires together to make it neat and tidy. I made a mount for my rear brake reservoir... I moved the reservoir forward compared to where it was stock.


My coolant reservoir tank seems to be big, bulky, plastic and is a huge eyesore...

I took one of my paintball CO2 20 ounce canisters and mocked it up... thought it looked like a neat and original idea... But 20 ounce is way to large... i would want more like a 5 ounce bottle...

My dad suggested to get a small white nitrous bottle with the chrome badge on it and use that as my coolant reservoir...

I like that idea, so i may be calling my local filling station to see if they sell the small cannisters empty.
 
#25 ·
sweet. i love a budget DIY build. im doing the same with my grenaded SV650. ima do all the work myself in a garage with minimal tools and storebought goodies... rat bike for sure...

now, ditch that front fairing and strap on a round light!

well done man - PB
 
#26 ·
Day 8

Today I mounted my rear lights. I had to make a mount for my running light/brake light. It fit securely to the frame underneath the rear lip of my seat. I started my quick splice and quick connects on my signals and brake lights. Now I just need to hook up the battery, cut my old wire harness for the rear lights and quick connect my new lights into the harness.

I made a new mount for my rear brake reservoir... the old mount made the reservoir stick out and was an eyesore.


The lights and seat are mocked up and the coolant reservoir will be replaced with something more creative.


Things left to do on the tail section: (so that I can use this as my commute bike again! It's been a long two and a half weeks without it)
1. Secure the seat
2. Connect my lights to the wire harness
3. Glass my under tail
4. Sand and paint the under tail
5. Find that nitrous canister for my coolant overflow tank
 
#29 · (Edited)
Day 9

I Decided to fiberglass the electrical box to the frame and all my welds and support rails for the subframe... I like the look this gave me. I used the bondo brand of fiberglass that had the two inch long strands of fiberglass in the putty. Needless to say it was crap to work with. So once I started I realized it was going to need a lot of sanding... about 2 hours of rough elbow action...


Here's a pic of the nasty bondo crap before I sanded it...


I also decided to remove the rest of the fairings off the bike... took off the mainstay, stock headlight and guage cluster... reducing more weight off this bike...
 
#30 ·
Day 10

I remounted the stock gauges to upper triple ... I removed them from the stock mainstay and took off the plastic bezel that was covering them... When I saw the gauges without the big plastic shroud... I thought they looked pretty neat... so I began placing them all over till I found a spot I liked. I like this off center look...

Here's a pic....


Playing with the off center look of the gauges, I decided I'd mount two headlights... and place them off center... the large headlight is wired in for high beam and the small headlight is wired in for low beam.. I made a bracket out of steel and mounted it to the lower triple.

It gives it sort of an off centered cyborg look...


I have to do something about the front fender... I'm going to cut it and free up the tire and rim a bit... let it breathe... it just seems out of place... almost as if its an eye sore, too restrictive.


so far I've remained to a low budget build... I am at about $110 included new H H front brake pads.


Now I need to wait for the humidity to lower.. it was raining today.. then I will begin the flat black swing arm, frame, engine, exhaust.


And the bike is incredibly lean... won't even rev above 6,000... so I need to order some jets and spacers for the needle... i'll play with that next.