Custom Fighters - Custom Streetfighter Motorcycle Forum banner

ninja 250 fighter

115K views 126 replies 30 participants last post by  Bskicrash1  
#1 ·
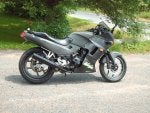
Here is what the bike began as
My commute bike. It's been painted again since this picture was taken.

DAY 1

Today I took the two mufflers off... the headache began.

I rode the bike with just the straight H headers (which dump underneath my pegs) after 5 minutes i had a headache from the raspy tone of the exhaust... sorta like a wet high pitched squeel. I added a thumbscrew at the end of my header pipes on both exhaust headers to deflect some of the sound waves. It helped... a little bit.

Jetting will be done later.

If this is the setup that i'm going to keep for the exhaust... then i'll make sure the headers and dumps look much nicer... but for now, I will continue with my commute


1. Took off both mufflers
2. Added resistance in the header pipes using 'thumbscrews'
3. Had to remove the bikes center stand (the mufflers stopped it from binding up the chain)
4. Cut the chainguard (from nasty block style to an inspiration of an R1's guard)

Cost= $1.38 for thumbscrews, lock washers and bolts from tractor supply
Time= 1.5 hours with test riding.
Weight reduction= 25-30 pounds (12-15 pounds per muffler, 5 pounds for the center stand, .02 ounces for the safety plastic cut from the chain guard)

Thats the chain guard.. which became very much visable without the muffler covering it up... so I had to chop it up


Thats the center stand, and two mufflers that I dropped from the rear


the subframe is next...
 
#34 ·
yeah, it will be... I had the carbs adjusted to the exhaust... then i decided to make pod filters... and well... it sucks way too much air... so i'm ordering kawasaki 108, 110, and 112 main jets... and some # 4 spacers for the needles...

The stock main jet is a Kawasaki 105... but basically with the high flow setup 108 and 110 main jets tend to be the ballpark and then playing with idle air mixture screws and the height of the needle jets...

so its going to be a pain, but i'll take my time and play with it till its right... its my daily commute bike, so I have to make it right! I'd rather only play with two barrel carbs than 4 barrels like some of the bikes on this site!
 
#36 ·
Just ordered kawasaki Main Jets #110 and #112 from Ron Ayers... first time doing business with them b/c denniskirk didn't sell the jets I wanted... (didn't want dynojet). I have to wait 10 days for the jets... i'm not a patient person... hope the order process's faster than expected.


The stock jets are Kawasaki #105... won't rev above 6K out of 14K... so I skipped the next size main jet since more than likely it would still sputter at high RPM's...

110's may be my key... but 112's if it will handle the gas without bogging down.


I'll pick up #4 metric washers so that I can raise my needle heights in the carbs once i've found the right main jet

i'm replacing all the fuel lines with a larger diameter high flow fuel line to increase my fuel flow to the carbs along with a larger see through in line fuel filter...

idle air mixture will be adjusted third and then possibly float bowl adjustments will be made along with synching the carbs...

I just hate the fact that I have to pull carbs... I find it very annoying.
 
#37 ·
Good call on the dyno jets, they suck ass on these bikes. I've used 1 of each stage 1,3, and 7 and still had problems with all of them. Out of the kawi jets though, you can make a pretty healthy screamer out of the 114 jets and a set of the dynojet needles on the third step. I set mine up for this with a highflow exhaust and v-stacks and never had any problems. My current setup is a 118 jet with a deburred and smoothed bore and custom slides, but with the ported head and light regrinds, it makes a huge difference.
 
#39 ·
Bought some truck bed coating for my swingarm and forks... some high heat paint for my engine case... two sets of LED license plate bolts... i'll use one set on the license plates and one set as eyes inside the paintball mask.

waiting for the temp to rise so that I can actually paint... its snowing in NY today ...
 
#40 ·
I drilled the C02 cannister for the coolant overflow... that is set, just need to mount it


I mocked up the facemask to the triples... it looks really good... I added two white LED bolt lights to simulate eyes... it's gonna make kids cry.

I had to make a new headlamp mount for my high and low lights...


i'll post pics tomorrow.
 
#41 ·
Day 11


I pulled the carbs out getting ready for the main jets to arrive.


I also mocked up the C02 cannister for the coolant overflow tank... Its a working model as the picture was taken...
Image


I also added two White LED bolt lights as eyes on the facemask.

I mocked up the facemask and new headlight mounts... I really like the facemask... compared to what I had mocked up last weekend.

Image


Image


Image


i'm in the process of figuring out how I want to chop up the front fender...
with the mask on the front... I think the fender needs to stay small and minimal.


just waiting on the main jets and the temperature to rise so I can paint...
 
#42 ·
Raise the helmet up so it covers the back of the gauges, if you can. I'm liking the basic direction, if I were you I'd fit two of your lowbeam headlights behind the mask and use one for low, two for high.
 
#44 ·
Day 12


I made new headlight mounts to accomodate two of my smaller lights to fit inside my mask... i had to remove the clear face shield in order for this setup to work... I also moved the mask up about an inch on the triples.

I love the new look!

Think this is how i'll keep my headlight setup...


Image
 
#45 ·
UPDATE:


I didn't like the C02 tank on the bike as the coolant overflow resevoir... it just didn't flow with the rest of the bike... and it seemed redundant to actually add something that weighed more than the stock part...soooo


so when i was at HESS today... this happened to catch my eye...

this is perfect size to fit next to my fuel petcock under my tank...

Image

I like it!
 
#46 ·
Day 13

I was busy today...


Today I masked the bike and painted the engine/crankcase and radiator. I used Rustoleum high heat 1200 F bbq paint.


I painted the upper forks, upper and lower triples, risers, headlight brackets, swingarm, electrical box, undertail and frame with Duplicolor Truck Bed Liner.

I added a cover for my speedo/tachometer to clean it up in the front section of the bike

Then I put on a crankcase breather

Then I mocked up the new coolant overflow bottle

Image

Image

Image

Image

Image

Image

Image

Image

Image
 
#48 ·
Day 14

I took apart and cleaned the carbs... to my surprise... a minimal amount of gunk at the bottom of my float bowls.

Installing the main jets took about 5% of my time..

Raising the needles took about 2% of my time...

and trying to fit the diaphragms correctly without crimping them against the upper carberator covers... about 93% of my time


even stuck the diaphrams in the freezer to try and shrink the rubber so that it would fit easier...

Did I mention how much I dislike diaphragms on carbs...

I'll have to put the carbs on and start some fine tuning...

Image
 
#51 ·
Day 14

I took apart and cleaned the carbs... to my surprise... a minimal amount of gunk at the bottom of my float bowls.

Installing the main jets took about 5% of my time..

Raising the needles took about 2% of my time...

and trying to fit the diaphragms correctly without crimping them against the upper carberator covers... about 93% of my time


even stuck the diaphrams in the freezer to try and shrink the rubber so that it would fit easier...

Did I mention how much I dislike diaphragms on carbs...

I'll have to put the carbs on and start some fine tuning...
You know it would have been easier to just by a prebuilt set from me:D

But you are correct sir, in the fact that those diaphragms are the biggest pain in the ass on these fucking bikes. And I'll never have to deal with another one again.:D
 
#49 ·
Hey Bski i like what you're doing with the bike a lot. I got the stock cans on my 250 still and I like the looks of your homemade baffles a lot better than having all that metal hangin off the back of the bike. would you recommend doing that setup or is it too loud?
 
#57 ·
I took the baffles out of the bike for this reason...

the header pipes are soo small... that the baffle adds way to much restriction and effected the bike poorly with accelleration...


what I did do that works well and is about 25% quieter than open headers..
run reducers on the end of my headers... the headers are 1.25 inches... I ran an end cap that has a 3/4 inch exit hole... it creates enough of a restriction to cause the harsh nasty sound to cancel out before exiting.... if you give me until saturday to finish painting and put the bike back together... i'll get a youtube video of idling, acceleration, coasting etc... with the exhaust....

I recomend this... just the weight reduction itself was worth it... this exhaust is loud... not earplug loud if your wearing your helmet though.
 
#55 ·
hes been a member since 08 guys. hes just hasnt posted all that much
 
#59 ·
Thanks for the heads up bski. Looking forward to hearing how it sounds cause this is an upgrade i really want to do but i wanna do it right. I'll keep an eye out for new posts. Keep up the good work man :rock:
 
#60 ·
Day 15, 16 and 17

Tuning the carberators...


I opened the carbs 17 times... I have them where I am finally satisfied.

I set my pilots just a tad lean... when I burp the throttle, the rev's hang for just a second then drop... (I like all my carb bikes like this just my preference)

The needles, after everything... I found I liked the responsiveness the best when I kept them at stock setting.(since the stock needles do not have clips due to the EPA emissions... I was using number 4 washers to raise my needles) I found a smooth rev range with 3 washers under each needle... but overall, my butt dyno didn't like it.. so I started dropping washers... until I was back to stock setting... I get a flat spot at about 5,500 and then the powerband kicks in at about 6,000... so when I ride... its smooth, flat spot, Powerband followed with a slight grin.

My main jets ended up going 2 sizes up... this gives the hardest pull to redline. When I was 3 sizes up... on decel, i'd get a slight pop and flame out of the exhaust... now as cool as this sounded and looked, I knew it wasn't was best for my bike... and the factor that if I burp the throttle at a stoplight.. i'm going to burn my ankles from exhaust flames


I am very happy with my carb settings now...


Day 18

I finally cut and grinded my front fender... it is less than half of its original size... and I love it. Pic's to come tomorrow.


Tank and fender were sanded by hand... just finished that tonight...

tomorrow flat black is on the agenda with some bit of a surprise...

I like how painted over stickers give a suttle added touch...


pics to come!:rock:
 
#63 ·
Day 19


I painted the front fender and tank today. I am satisfied with the way it turned out.

This is what my chopped up fender turned out as.

The silver is all done by hand on top of the basecoat... it took me a lot of planning on paper to be able to free hand it... I was very nervous that i'd mess up on the tank and have to start all over again... But... only one mistake... one dab of silver near the right wing.


The design: A cross that has angel wings growing out of it... and from the head of the cross, a sword extends... and the tip of the sword ends on the front fender... it matches the lines of the front fender... and the wings wrap around with the tank angles and design...

the pictures do not do the tank justice.


Flat black base coat

Flat clear top coat

Image

Image

Image

Image

Image

Image
 
#68 ·