

After being without a bike for about 2 years, I decided to pick up an XV1100. I always had I4's, with the exception of my XS850 triple, but have wanted to give a twin a try. I wanted something with more grunt, where the power was usable, legally, on the street. The Virago 1100 has that, and I think they look really cool with a little work. I don't plan to go crazy with it, as I don't have the resources to do what Knifemaker and others have done to their XV's, but some modernizing and cleaning up I do plan to do.
I started with a '98 that was fitted with saddle bags / highway bars / back rest / skeleton hand mirrors / purple ghost flamed tank / and purple neon led glow kit from the previous owner.
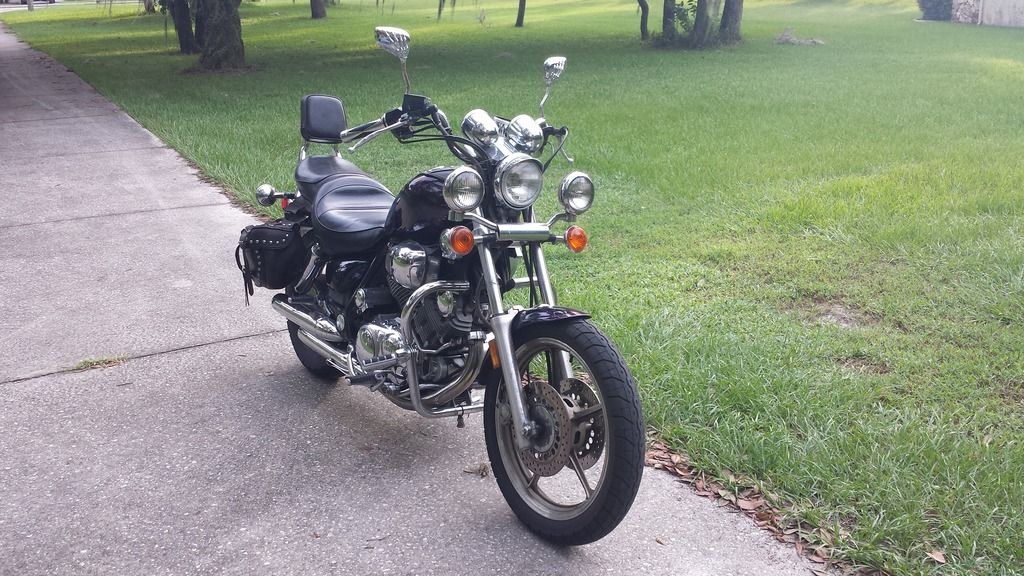
It is actually a very clean bike, but I had to get rid of all that crap from it.

I've stripped a bunch of crap off, aside from the highway bars, but they'll be soon to follow. I'm just using the highway bars for jack stand points at the moment, since there is no bottom frame to lift the bike from. I've synced carbs, changed fluids, checked / adjusted valved, and fixed a small oil leak from the oil level sending unit. I've also picked up a few parts. Some have arrived and some I'm still waiting on.
I picked up a set of '91 / '92 GSXR 100 USD's off craigslist that needed fork seals as well as the upper triple clamp, axle, and axle pinch bolts. It wasn't until I got the upper triple in that I realized the lower triple that came with the forks were for '93-'98 forks. While the 91/92 USD's share the same lower fork tube size of 56mm, they don't share the same fork to steering stem offset. So, I had to buy a lower triple for the '91/92 forks. There is a lot of conflicting info out there on dimensions of the GSXR 1100 fork sizes too. For those seeking it in the future, GSXR 1100 USD's are not the same. Mainly, they both share 56mm lower fork tube diameters, but the upper fork tubes on the 91/92 are 52mm, whereas the 93-98 are 50mm. And, as I stated, the fork to steering stem offsets are different between the 91/92 and 93-98. Anyhow, I chose these forks due to their length being longer than just about every other USD fork out there, at a little over 30" long. The Virago doesn't have much ground clearance as it is, so coupled with shorter forks and a smaller diameter wheel over stock, I needed as long of a fork as I could get.
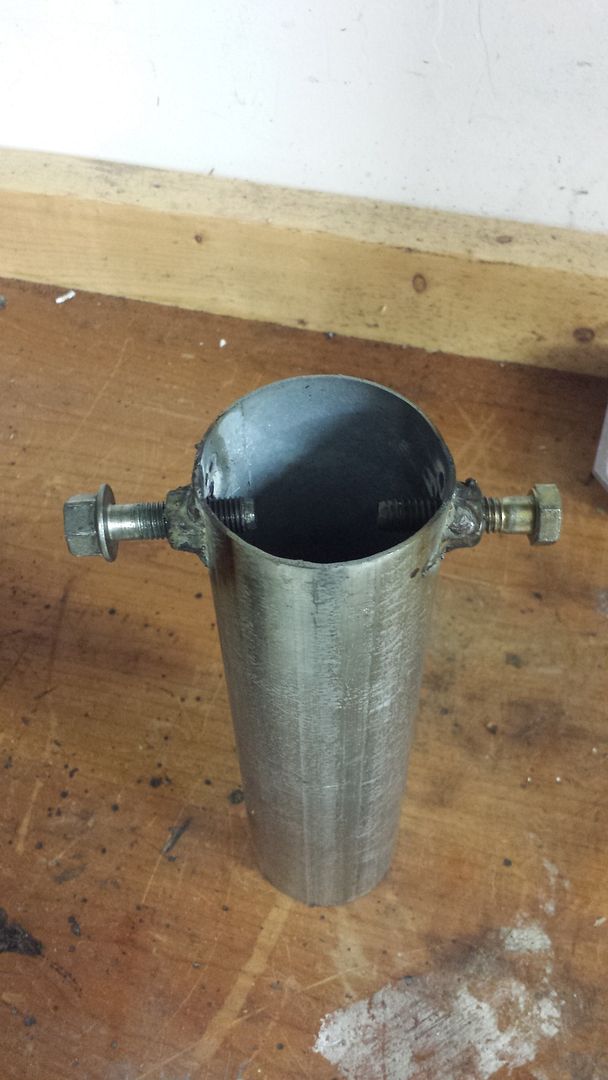
After getting all the associated fork parts, I changed the fork seals. I've never done forks seals before due to the supposed complexity of the job, but it really wasn't much of a deal. I watched a youtube vid and made a fork spring compressor out of some galvanized chain link fence post and a couple nuts and bolts, which worked perfectly. The cylinder portion is way longer than it needs to be, but it was just a section of pipe that I had and didn't feel the need to cut it.
I pulled the stock front end and mocked up the GSXR forks. The gsxr forks' steering stem was just under an inch too short. Fortunately, the steering stems from both bikes shared upper and lower steering stem bearings, so the stem swap was a direct fit. I just had to cut the XV stem out of the lower triple, then had the machine shop do the press work. I also had to ream out the upper triple for the steering stem to fit in.
For the front wheel, I wanted something that would closely match the Virago rear wheel. As I'm not doing any crazy chain conversion, the factory rear wheel is staying. It us a 5 spoke, so the gsxr1100 3 spoke front wheel wouldn't work. The closest affordable wheel would be newer r1/r6 5 spoke wheels. While their spokes have a slight twist, the are close enough for my liking, as they would mostly be concealed by brake rotors anyways. The issue with them is that they fit a 22mm axle and the gsxr1100 is 20mm. There are no conversion bearings to be had, but I was able to source some 20mm id x 22mm od flanged bushings.
Continued....
I started with a '98 that was fitted with saddle bags / highway bars / back rest / skeleton hand mirrors / purple ghost flamed tank / and purple neon led glow kit from the previous owner.

It is actually a very clean bike, but I had to get rid of all that crap from it.

I've stripped a bunch of crap off, aside from the highway bars, but they'll be soon to follow. I'm just using the highway bars for jack stand points at the moment, since there is no bottom frame to lift the bike from. I've synced carbs, changed fluids, checked / adjusted valved, and fixed a small oil leak from the oil level sending unit. I've also picked up a few parts. Some have arrived and some I'm still waiting on.
I picked up a set of '91 / '92 GSXR 100 USD's off craigslist that needed fork seals as well as the upper triple clamp, axle, and axle pinch bolts. It wasn't until I got the upper triple in that I realized the lower triple that came with the forks were for '93-'98 forks. While the 91/92 USD's share the same lower fork tube size of 56mm, they don't share the same fork to steering stem offset. So, I had to buy a lower triple for the '91/92 forks. There is a lot of conflicting info out there on dimensions of the GSXR 1100 fork sizes too. For those seeking it in the future, GSXR 1100 USD's are not the same. Mainly, they both share 56mm lower fork tube diameters, but the upper fork tubes on the 91/92 are 52mm, whereas the 93-98 are 50mm. And, as I stated, the fork to steering stem offsets are different between the 91/92 and 93-98. Anyhow, I chose these forks due to their length being longer than just about every other USD fork out there, at a little over 30" long. The Virago doesn't have much ground clearance as it is, so coupled with shorter forks and a smaller diameter wheel over stock, I needed as long of a fork as I could get.
After getting all the associated fork parts, I changed the fork seals. I've never done forks seals before due to the supposed complexity of the job, but it really wasn't much of a deal. I watched a youtube vid and made a fork spring compressor out of some galvanized chain link fence post and a couple nuts and bolts, which worked perfectly. The cylinder portion is way longer than it needs to be, but it was just a section of pipe that I had and didn't feel the need to cut it.

I pulled the stock front end and mocked up the GSXR forks. The gsxr forks' steering stem was just under an inch too short. Fortunately, the steering stems from both bikes shared upper and lower steering stem bearings, so the stem swap was a direct fit. I just had to cut the XV stem out of the lower triple, then had the machine shop do the press work. I also had to ream out the upper triple for the steering stem to fit in.
For the front wheel, I wanted something that would closely match the Virago rear wheel. As I'm not doing any crazy chain conversion, the factory rear wheel is staying. It us a 5 spoke, so the gsxr1100 3 spoke front wheel wouldn't work. The closest affordable wheel would be newer r1/r6 5 spoke wheels. While their spokes have a slight twist, the are close enough for my liking, as they would mostly be concealed by brake rotors anyways. The issue with them is that they fit a 22mm axle and the gsxr1100 is 20mm. There are no conversion bearings to be had, but I was able to source some 20mm id x 22mm od flanged bushings.
Continued....


