Custom Fighters - Custom Streetfighter Motorcycle Forum banner

imsolidstate's 1992 GSXR 600w

1 reading
29K views 162 replies 30 participants last post by  imsolidstate  
#1 ·
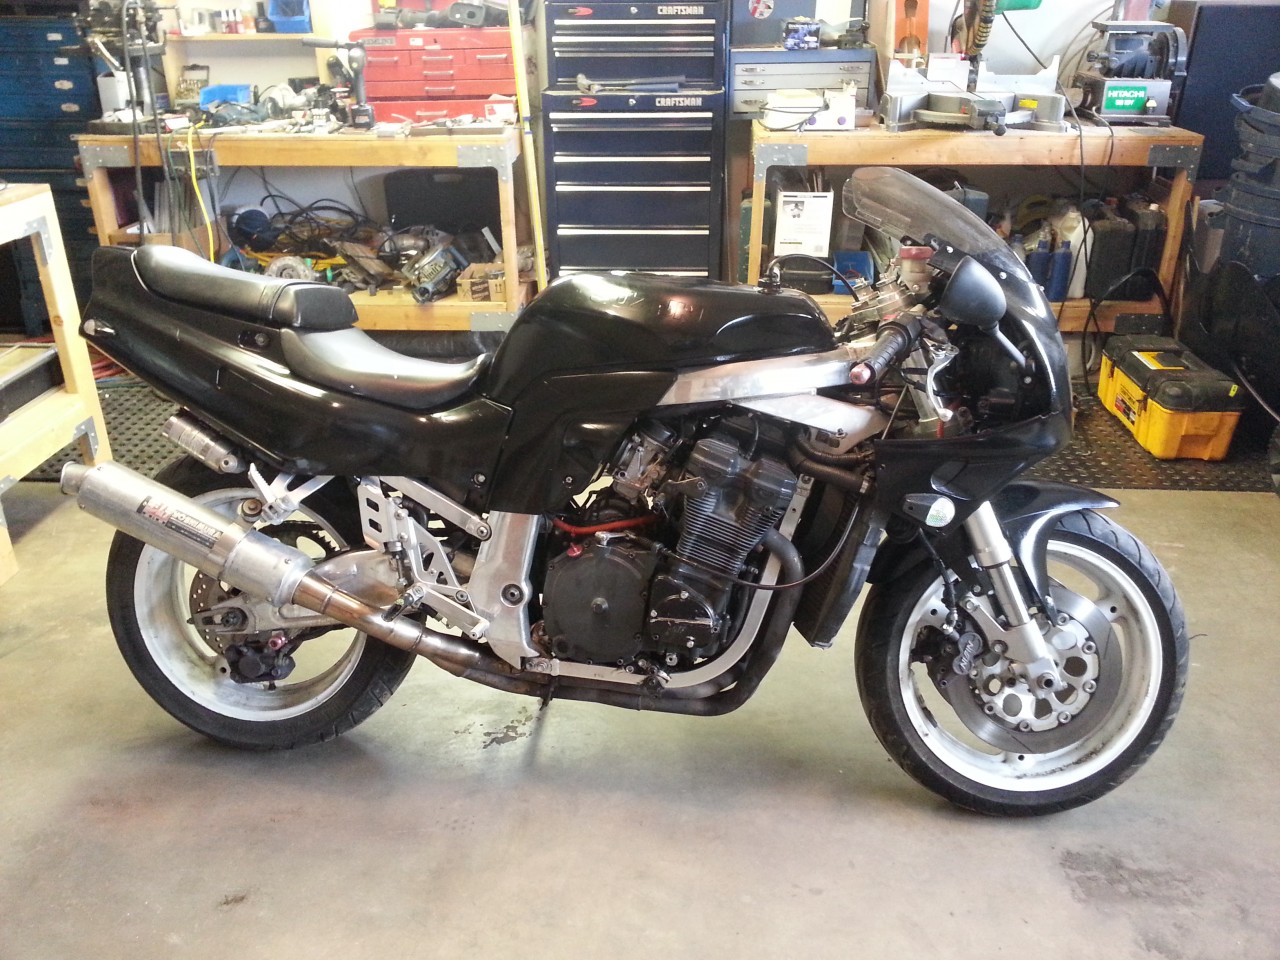
I decided to do a thread to document all the work I've done on my bike the past couple months. Here's what I brought home:

Image


It wouldn't start. Here's what I did before I figured out the problem:

Drained the tank, rebuilt petcock and verified operation, installed new fuel.
Rebuilt carbs, set float height at 15mm, cleaned all jets, set idle circuits to 1.5 turns out, verified operation of variable venturi slides, etc.
Drained the crankcase full of fuel/oil mix and installed synthetic oil.
Verified crankshaft signal generator at about 150 ohms.
Checked spark plug gaps. 0.6mm.
Checked CDI box for power, ruling out neutral switch / sidestand switch.
Checked ignition coil resistance and checked for an 8mm spark as per the manual. Got a pink spark at 8mm through the wires by butting up the spark plugs and clamping them at the proper distance, then cranking the engine.
Adjusted valve lash. Lash was way off, even after installing thinner shims I am still on the low end at .009" intake and .015" exhaust. Intakes originally measured 0, exhaust .01".
Verified cam timing as per the manual when reinstalling cams.
Battery is new, and I have charged it back up a couple times since I've been running the starter so much.

I tried pulling the carbs back and spraying starting fluid directly into the intake ports, and cranking the motor. Nothing but a little sputter once in a while. I have a crap compression tester, and it's only showing about 40lbs pressure. I figured it was giving me a bad reading so I built an adapter to pressurize the cylinder with compressed air. Cylinder #1 has an exhaust valve leak, but the other valves are good and tight. All cylinders exhibit blow-by through the crankcase though. I think I used about 50psi, and you could feel/hear air through the crankcase.

I pulled the cylinder head and cylinder block and found evidence of a failed head gasket. Apparently water had stood in the cylinders for a while, because the rings were all corroded and stuck in the piston ring grooves. Hence the low compression.

So I tore everything apart, cleaned the valves and pistons, and installed new rings.

Image


Continued...
 
#2 ·
I honed the cylinder walls with sandpaper just to remove the polished areas on the sleeves. I didn't trust a hone tool to not remove too much metal. I also rebuilt the head gasket since it is a steel shim gasket. One of the locations the gasket failed was where there was a "dent" in the embossed area. I very carefully restored the shape of the embossed fire rings and reassembled the gasket with high temp spray copper gasket sealer. I did this because I didn't really want to spend ~$100 for a new OEM gasket that could do the same thing if it was even slightly dented. The odds of an OEM part on a 22yr old bike not being beaten up a bit is slim I think.

I also ordered new valve shims to get some more clearance.

Image


I was working on the head and tail lights at the same time. I'm not a big fan of the tiny headlamps on a lot of fighters (I'd like to actually see at night) and I think the big round headlight look is a bit dated too so I bought a Hayabusa headlamp. I think it looks sick. Unfortunately my mount isn't the prettiest since all I have to work with at the moment is my trusty old arc welder. I repurposed the stock headlight mount. I don't think it looks too bad, my wife says "it needs cleaning up a bit". Well sure, I'll get right on it when you buy me a TIG welder haha.

Image


I also made up a mount for a newer model GSXR taillight. Still need to trim down those square bars so they flow with the angle of the tail.

Image
 
#3 ·
So I get it all back together and it looks like this:

Image


Did a lot of rewiring / rerouting of cables along the way to clean up the front end.
I swapped out the rear shock for a newer GSXR and got rid of the remote reservoir. This also allowed me to remove the steel frame and trim up the inner fender plastics. Cleaned up the back a lot. I still hate the crap black spray paint though.
 
#4 ·
At this point there isn't much I haven't had to fix, this thing had a hard life. Went to bleed the brakes and replace the brown fluid and the bleeder screw sheared off. Had to drill / tap and install a different fitting. One of the forks is leaking pretty bad, I have the seal kit but need to order stiffer springs first.
Lots of stripped, rusty, incorrect hardware that I've replaced. EVERYTHING was loose on this bike.

Started stripping the fuel tank with acetone. I was hoping that the factory paint might be decent enough to avoid repainting but no. Somebody had fun with a sander. I took a few days but I got the black / blue / white repaint jobs off the factory paint. I rolled it out of the garage for this picture:

Image


Headers are still all greasy, they should look better after the engine has run for a while.
 
#6 ·
Finally got to ride it yesterday! The idle adjustment screws were way off, it wouldn't idle below about 3k. The manual says 1.5 turns out, but that was way too lean. The carb is rebuilt so I set everything to factory. Adjusted them to 2.5 and it runs awesome. Pulls great everywhere, sounds great and is really smooth. I love it! Oh and by the way this is my first bike. So I have a noob question. It feels a bit "twitchy" at lower speeds, kind of like a subtle back and forth in the steering that makes me feel a bit like it's weaving. I thought I had read that stem bearings being loose could cause that. It also seems like it's just a little off to the side, like the bike isn't exactly level. It has definitely been down in the past, but I didn't see any frame damage. I haven't messed with the rear wheel yet so maybe it's an alignment issue or something.
When I got back I looked at the chain, it's trashed from the ride. Looked good when I left, but the rollers are all chewed up now (some missing!) and some of the links aren't lining up straight in the chain. I guess thing has sat for a really long time. New chain is next.
 
#7 ·
For the wobble...
Easy thing is to mess with the tire pressure first. What are you running at now F/R?
You can play around with the fork height in the trees and see if that helps too...

First bike, not the first time turning some wrenches though?! Looks like you are doing just fine man...
 
#8 ·
Thanks man. Yeah my tires are shot, they are old and the front are cupped. Before I rode it they had 20psi, I bumped them both to 35psi, think that's close to what was recommended in the service manual.
I'm not sure where the fork should be honestly. The clip ons were way low, a couple inches below the top triple mount. I moved them up when I saw the threaded hole on the bottom of the top triple, looked like they were supposed to mount there. My fork seals are leaking so I will be pulling the forks sometime soon.

New chain today as well.
 
#9 ·
I changed the fork seals. That was a bit of work, had to make a couple pieces since I don't have the compressor tool. It didn't want to come apart either, and one of the seals didn't go in very easy. There is some sticktion. I think long term I will have to swap forks.

Ok, I'm looking for some advice. I'm getting ready to tear the bike down again since it's so cold/dark right now. I'm going to try building a new subframe, something shorter and smaller but I'm not bolting on a different sport bike tail. I want something metal that I can leave looking metal. Aluminum. I'm working on getting my oxyfuel setup going so I can weld aluminum with it.
Anyway, I'm going to lose a lot of room where the battery is and so I was wondering about ditching the airbox for pods. I read that they are really tough to set up and tune. Is it worth it, should I leave the stock airbox on? It's sort of ugly. I could try making a new one but isn't the actual volume and shape of the airbox important? I could try to make the stock airbox a little better looking somehow, remove the fairing mount or something, and relocate the battery to the tail. It runs good right now so I hate to mess with it. I have a spare carb that came with the bike but I know nothing about it. I have no idea how to tune it without a bunch of time, an assortment of jets, and a dyno. Any thoughts? Thanks.
 
#10 ·
im a bit confused about sandpaper hone thing...

also does the bike feels wobbly when crossing road markers and asphalt connection points, when crossing them parallel. that might be bearings. especially if the chain is busted.
 
#12 ·
Thanks Pariah! Rex, the sandpaper thing came out of a thread I started here:
piston rings - hone or not
thanks to the input from those guys I decided to break the glaze / polished areas of the cylinder wall but I didn't trust a cheap hone tool to not leave deep scratches or mess it up so I folded up some thick wetsand sandpaper and made hatch marks by hand. It turned out pretty good, I took some pictures of it I think. It smoked a bunch when I first started it, but after an hour ride of really beating on it she was super clean.

So I'm thinking about using round tube for the subframe instead of the square tube that is there. The square tube is a little ugly. But will it look good with the cast frame, since the rest if the bike isn't round tube? I'm thinking of something like the bike on the cover of the current issue of cycle world, the one-off TZ750. The round tube and heim joints that hold up the tail look great. I need to get cracking at this, get something mocked up and see how it looks, but I am still riding my bike occasionally and I hate to tear it apart! I rode last night, it was about 50 degrees when I left and 40 when I got home. Brr.

Oh and the wobble thing, I'm not sure but I think it may just be a noob rider thing. I've noticed that at low speed where the bike doesn't stabilize itself well, if I'm putting too much weight on the bars it seems twitchy and unstable. I have a back injury so I get lazy sometimes, but if I squeeze the tank with my knees and use my core muscles to hold my body and get off the bars, it isn't a problem. It would probably help too if I had a steering stabilizer, it still has the original one that goes down the side and it's pretty shot.
 
#14 ·
Work commences. I built a stand for my bike and got it up where I can work on it. I got the subframe off after drilling all four bolts and using a screw extractor looks like someone went crazy with the Locktite. I saved the threads thankfully. I started mocking up a new tail. I'm still trying to figure out how to finish off the end of it. I can't decide if I should lengthen it a bit, or just cut it along the black line and keep it thin.


Image


Image


Image


Image


Image
 
#17 ·
Thanks Racing Geek. That looks really good how the top plane of the tail and the tank are coincident. I also like the shape of the tail. How wide is the seat and tail? What motor did you swap in, Suzuki didn't make oil cooled 600s right?

I will keep thinking about what I made, versus what you have. My reasoning was that on a streetfighter there is little concern for aerodynamics and I won't carry a passenger so I don't need a big tail, my purpose in making the tail thin and short was to emphasize that it is only a place for the rider to put their butt. And a few electronic bits. I'm trying to get it as simple as possible, I like the "wheels and an engine" look but I think a full bobber tail looks a little weird. I also think a big tail unbalances the look of the bike without something big at the front too. When I look at my bike from the side it looks balamced front to back.

Is it just me or is my bike sitting low in the back? I swapped out the shock for a newer gsxr model, but it still doesn't look as tall as yours. I checked over all of the rear suspension, it all looks stock to me.
 
#18 ·
suzuki had oil cooled 600cc, bandit and kat.
as for tail and styling. You can always find an option that looks slim and dont disturb the clean look. Also look for guy martin pikes peak turbo gsxr. That has a small and good looking tail
 
#20 ·
I used a 600cc Katana engine and it just barely fits. Another thing worth mentioning is don't swap in a 900rr swingarm like I did. It was a total pain in the ass with all the material that had to be removed and all the spacers that had to be machined. The rear suspension linkage and upper shock mount was a pain in the ass to figure out too.

If my bike looks like it sits higher in the back that's because it does. I'm 6'3" and I hate feeling like I'm sitting in a chair at stop lights so I raise up the back of all my bikes. If I remember right I added 2* to the swingarm angle and then the seat is about 3" higher than stock. Unless someone has abnormally long legs or are over 6' tall they probably won't be able to flat foot any of my bikes.
 
#23 ·
I used a 600cc Katana engine and it just barely fits. Another thing worth mentioning is don't swap in a 900rr swingarm like I did. It was a total pain in the ass with all the material that had to be removed and all the spacers that had to be machined. The rear suspension linkage and upper shock mount was a pain in the ass to figure out too.
Was the engine swap worth it? I think my motor is okay but second gear is iffy and I don't know if I'll be able to get parts. I've wondered if it was worth looking for another engine/tranny or just getting a different bike when this one won't shift anymore.

If my bike looks like it sits higher in the back that's because it does. I'm 6'3" and I hate feeling like I'm sitting in a chair at stop lights so I raise up the back of all my bikes. If I remember right I added 2* to the swingarm angle and then the seat is about 3" higher than stock. Unless someone has abnormally long legs or are over 6' tall they probably won't be able to flat foot any of my bikes.
I'm 6'2", is there anything you can do to the stock suspension to raise the rear?
 
#21 ·
As far as liking that the top of the tank and tail line up that's because it drives me absolutely nuts when people build bikes and they don't pay attention to that. A straight edge is such a easy tool to use...

Image


As for the seat width, at the back along the bottom where the crease in the cardboard is it is 9" wide and tapers to 7" at the top of the tail. The front of it is obviously as wide as the tank. I never took any photos of the bike after the winter build off last year so these are all old but you can still see what I mean.

Image

Image
 
#22 ·
As far as liking that the top of the tank and tail line up that's because it drives me absolutely nuts when people build bikes and they don't pay attention to that. A straight edge is such a easy tool to use...

Its not always that easy. My vfr is an example. Tail im making wont be comfortable with that line. Of course if you are making it like you did, then yes
 
#25 ·
Okay, here's my second try on the tail.
Don't be too hard on me for those shiny chicken strips which just happen to be really obvious now. I just started riding in July. I was afraid to push those tires much, I looked up the manufacturing code, they are ten years old! I'm hoping to get them replaced before I start riding again in spring.

Image


Image
 
#26 ·
Just my 5 cents, what if that vertical part, that goes along the frame would follow into a nice curve on to the tail lover line. Just that sharpish angle turned into a curve.

Also bout strips (not that i dont have them) look for some local track action,helps a lot. I started to ride in early spring this year. And month after i went to track. My riding wasnt the same anymore. Seriously it is the best way to understand how much you can do.
 
#27 ·
Just my 5 cents, what if that vertical part, that goes along the frame would follow into a nice curve on to the tail lover line. Just that sharpish angle turned into a curve.
I'll think about it. It will be tough since I don't have access to a sheet metal brake right now, I was going to try cheating with a homemade style press brake.
What I was thinking though if I could pull that off was to use a chamfer instead of a fillet, like the frame does where it bends the other way. I just have a feeling it's going to stretch and look strange though.

Also bout strips (not that i dont have them) look for some local track action,helps a lot. I started to ride in early spring this year. And month after i went to track. My riding wasnt the same anymore. Seriously it is the best way to understand how much you can do.
Thanks Rex, I really want to get on track. There's a racing club here that I want to get into but I cant afford a track bike right now. They have a race school in the spring that I want to go to but I doubt I'll have everything track ready by then. And leathers are expensive.
I started scratching off that shiny stuff by the end of summer but I know I shouldn't be riding like that on the street.
 
#28 ·
Here is a mockup of the headlight. I'm going to remount the headlight to the forks, I am going to get it as close as possible. I actually want something a bit smaller, but the busa headlight lights up the road so good I just have to use it. I rode mostly at night, after my kids go to bed.

I have decided I like the tail so I am going to go ahead and start building it. I will probably make the section from right off the frame to the seat out of steel so that it is strong enough, and make the rest of the tail from aluminum sheet. Whether the tail ends up aluminum or not depends on my welding skills. I am still not sure how I'm going to paint it, but I like the red/white on the tank so I will probably paint it white.

Image
 
#29 ·
Dont you have track days for street motorcycles? also for leathers. I got really lucky and had an opotunity to buy mine for 95€ new. Only thing i had to do was to take leg zippers to resew. Not a.big brand but leather is leather. Tried it on tarmac same week