Custom Fighters - Custom Streetfighter Motorcycle Forum banner

FFE (forkless) RZ350 clean up and re-paint

44K views 61 replies 28 participants last post by  rat_rod_russell  
#1 ·
I thought I'd post some of the process of getting my FFE (forkless front-end) RZ350 ready for a show. In February I'm planning to take this bike and the CHOPPRD RD400 http://www.customfighters.com/forums/showthread.php?t=61719 to The One Motorcycle Show in Portland. This is an awesome event and I'm supper stoked to be invited to show my bikes there.

The FFE RZ350 is in need of a major clean up and re-paint. While the tail, tank, and fenders are off to the painter, it was time to strip down the chassis for some serious cleaning. I may also send a few pieces of hardware off for re-plating and some of the engine side covers and trim parts will be replaced with new parts. Hopefully the bike will be show worthy in a few weeks.

The first order of business is getting it down to the bare frame.

Here is the chassis with body work and rear sub-frame (this bike also has a front-sub-frame) removed...

Image


Image


Image


Here is the roller with engine out...

Image


Image


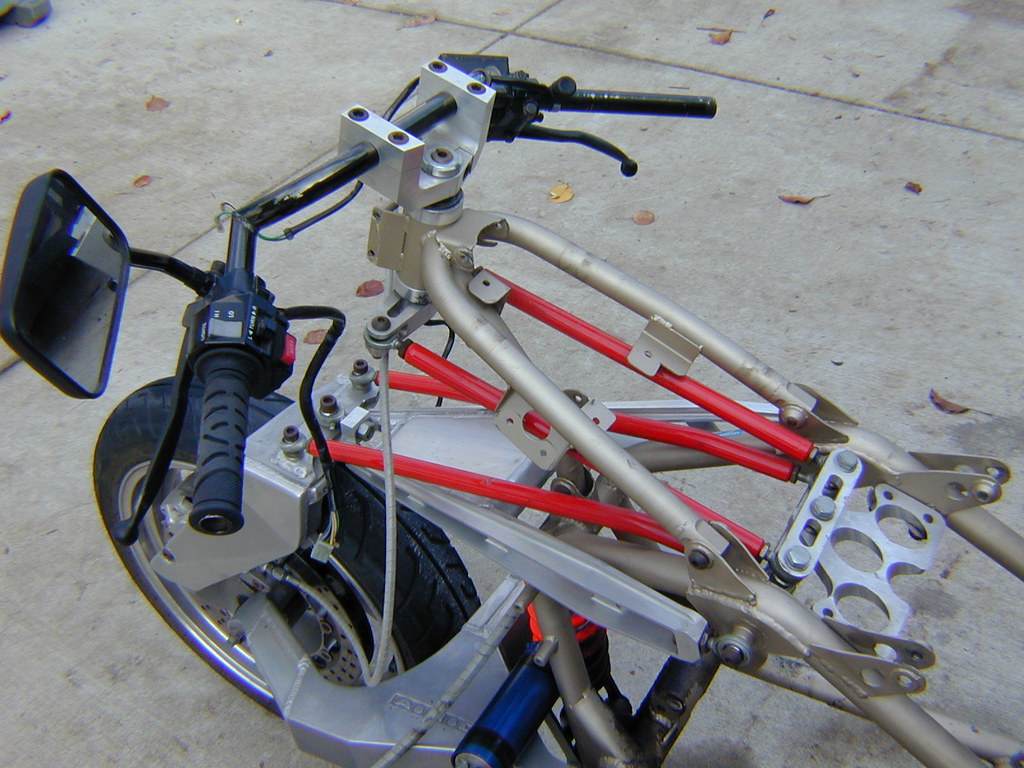
Little better pic of the steering linkage (I get a lot of questions about this. As you can see, the linkage system is redundant (left and right sets of linkage). This is so that the linkage can be adjusted to have a slight amount of tension (left and right sides slightly pulling against each other) to eliminate any free-play in the rod-ends. The rider feedback when riding is excellent. It feels very similar to a conventional bike in terms of road feedback. There is essentially no vagueness or slop in the system. The steering feels very solid and connected to the wheel.

Image


Roller with everything but suspension and brake systems removed...

Image


Image


Here is a close-up of the front brake setup. Note the twin-discs, and three-padded caliper. Both rotors float and there is a double sided pad that floats between the rotors. The grungy goldish color fins on the caliper is the heat-sink for the middle pad. Stopping power is excellent.

Image


Image


Then finally down to bare frame. Many people ask if the frame is a stock RZ350 frame that has been modified as it has some similarity, but with everything removed you can clearly see it is a pair of continuous hoops on each side with no conventional steering head. With the engine in the bare frame it looks more like a generator than a motorcycle. The blue and silver sticker is the California assigned VIN as assigned by CHP for a "Specially Constructed Vehicle". Having a specially made work stand to support the frame during assemble (and dis-assembly) is very helpful. It is designed with an internal threaded mechanism so it can be adjusted to correct height.

Image


Image


Image


Stay tuned as the cleanup continues and the bikes starts coming back together:thumbsup:
 
#7 ·
First want to thank everyone for the props! Much appreciated. I'll be posting more pictures and detailed descriptions as the bike goes back together.

I've been asked to do a "build" thread on this bike, but most of it was built long before digital cameras existed and I really don't have the patience to figure out how to scan seven years of slides to digital format... even if I could find them all. So this will kinda be like an condensed build thread as I re-assemble the bike.


Unfortunately no video. But here is a good action shot taken at ThunderHill Raceway many years ago.

Image
 
#4 ·
There is a lot to take in from those pictures, holy crap...
Thank you for explaining it some, I like the inner workings shots :)
Subscribed to see where it's going...
 
#6 ·
very very cool! But sorry those bars and mirror don't do it justice.
 
#9 ·
I agree about the mirror. I need to find something more modern. As for the clubman bars. Well, I always ran clubmans on my RDs and RZs... so seamed fitting to use them on this bike. The design is to utilize conventional 7/8" single-piece handlebar, so I could easily install something more upright (superbike bend). I'm open to other suggestions though?

I also had some early sketches with push-pull bars running on linear tracks connected to the linkage, but way too complex when I started thinking about the fabrication and extra weight.
 
#10 ·
I had the bike weighed when I took it to the International Motorcycle Show in Los Angeles in 2001. If I remember correctly, and according to the Teamster's scale, it was about 350lbs. My goal wasn't really to minimize weight (compared to the stock bike), but just to not make it heavier. The front suspension and wheel are over engineered, so there might be 15 to 20lbs that could be saved if I ever re-make some of those parts.

The project started in 1990 after I graduated from college. The front suspension was mostly designed by hand with pencil and paper (literally). By the time I started on the frame design I was just learning to use 2-D CAD (anyone remember Claris CAD?) on a Mac SE.

It started as a "one-year" project to modify an existing RZ350, but evolved from there into a ground-up design. I was very foolish thinking I could build it in a year, but in hindsight it was worth it for the vast amount I learned along the way.

By the time it was "running" seven years had passed. I had a roadracing license, so easiest way to do some "test" riding was to inter some races. It was always fun going through tech inspections as the tech inspectors were never sure what they were looking at. So mostly they just waved me through figuring I knew what I was doing.

After a few races and a test ride by John Joss for an article in Roadracing World the bike sat for a number of years. Then in 2000 it was cleaned up, new custom tail made, and re painted. I used the bike for promoting my new business building conventional frames (A-N-D AK-1).

A few more years later I finally decided to add lights and get it titled and street licensed. Since then I've been slowly trying to finalize the lighting and other details. Someday I might consider it finished... or not.
 
#13 ·
:thumbsup: I don't want to jump too far ahead, but I'll say that I don't think you'll be too disappointed with the aesthetics. If you snoop around on google there are lots of pictures around showing the new headlights and windscreen. It is very alien looking. Also the tail has been kicked up a few inches, but the tank will remain the same.

But I should maybe mention that my highest priority with this bike has always been to make it look as close as possible to what a major manufacturer might build as a concept or even future production bike. I very much DONT want it to look like a garage built "custom". With the new paint scheme and factory looking Yamaha decals, many people are going to mistake it as being a Yamaha built bike... which would be fully my intention.
 
#12 ·
It just occurred to me that I can't talk about the history of the forkless RZ without mentioning the Yamaha Recon. I have always been fascinated by alternative suspension designs, especially on the front of motorcycles. For years I collected any book or article I could find with articles on ELF Hondas, James Parker's RADD bikes, Nico Bakker's bikes, Tony Foal's bikes, and any other 2-wheeled oddity.

Finally by my junior year studying transportation design I got an opportunity to build a prototype of what I had been reading about. An advanced product design class got to have Yamaha as a corporate sponsor for one semester. Each student was given a pre-production Zuma scooter if deemed to be needed for his/her project (one student took a scooter, but then had to give it back when his final project was something completely different) and any spare parts they needed for their project. We also revived about $750 budget for misc. supplies. Most students built non-functional models. But a few of us were successful in building functional running prototypes.

My "Recon" off-road scooter concept was designed and fabricated in 14 weeks. Here is a nice studio shot....

Image


The scooter prototype was a huge boost to my confidence. It was because of the success of this scooter project that I thought I could build a "real" motorcycle prototype within a years time and began drawing ideas for the forkless RZ.
 
#22 ·
I'd encourage you to build it! If you have the inspiration, don't let a few details get in the way. When I started the project I was living in a small apartment with no garage and only a box of hand tools.... but I knew had to build this. I just figured things out as I went and acquired tools and equipment when ever good deals would pop up.

I agree that cost is the universal hurdle that we all most face, but sometimes it just takes some social engineering. My forkless bike could not have been built if not for a few good friends I met along the way who understood my passion and were very supportive with their own time and resources. This forum is a fantastic place to find like minded people with every imaginable skill and resource, and most are very willing to help out.
 
#15 ·
#20 ·
I use a ball joint from a Yamaha GTS1000 (which also has a swingarm front suspension) Unfortunately most ball rod ends are manufactured for the load forces going in the opposite direction as needed. So its not easy finding the right part. On the Recon scooter I used a ball joint from the front suspension of a Suzuki quad.

I try to get a pic of the joint when I do the re-assembly.
 
#23 ·
Amazingly good looking work - looks like it rolled out the Bimmota race shop, and better than a lot of the Elf bikes I;ve seen pictures of.
Is that hub-center steered, or is the axle supported by a steered upright?

Nice to know a pencil-and-paper design can work out, that's what my Hossak has ending up as. Looks like I may be a bit ambitious thinking I can get it done in a single winter, as my first ever bike project... we'll see. I'm taking a lot of shortcuts (no custom frame) and am not ashamed to be seen on a rat bike, so maybe its do-able...
 
#24 ·
Thanks for the compliments! Much appreciated... I often made parts harder than they needed to be just to get a "factory" look.

The axle is supported by the steered upright, so technically not a "hub center" design. That said, I do have a true hub-center project that I might get to someday after I finish a bunch of other halfway started projects:doh:

Nothing wrong with a rat bike, especially to test some ideas. If it works well, you can always take what you learn about the design and do a phase-II re-build with nicer parts... or if you're like me you'll satisfy your design curiosity and move on to something big, better, or different. Its all good!
 
#29 ·
I now have about a month to get the bike cleaned up and re-assembled. I'll follow the same order as the original build and try to recount some of the original design and construction process.

With the basic front end design on paper (literally, as I didn't own a computer at the time) I decided to start with one of the most difficult parts to produce... the front wheel. As I've mentioned before, I really wanted this bike to look like a factory concept and not garage built. With this in mind, I would need front and rear wheels to match. I would also need a modular constructed wheels so that I could use an existing rim mounted to a custom machined spider (center) for the front wheel. Turns out Kosman Specialties makes (or was making at the time) some nice drag racing wheels that looked good and were a modular construction. The bonus was that their shop was only a few blocks from where I was working.

The rear wheel is semi-custom in that they machine the hubs to fit a sprocket and rotor to my specs. Then they supplied a blank front rim to match the rear. So all I had to do was get the front spider machined. That should be easy, right?

The front spider started as an 80 lb block of solid 6061-T6. I found a local machine shop with a large enough lathe to turn the profile. Bob, the machinist and son of the owner would later become a good friend and ended up making most of the first machined parts on the bike.

With his machining skills the square block of aluminum slowly became what looked like a big silver salad bowl. Next was to get the spoke pattern cut out... so back to Kosman.

Turns out in spite of the all the custom work they were doing, for some reason they didn't want to do the front wheel, but instead referred me directly to the shop that was doing their CNC work. A few weeks later I had a spider and with the Akront rim attached had my front wheel done!

Pictures should be self-explanatory....

Image


Image


Image


Image


Image


Image
 
#31 ·
Very nice, have always been fascinated with Hossak, Foale, Saxon etc. Just like to see someone trying to find a alternative to telescopic forks (not that I have an issue with them, just the thought that there maybe something better out there)

Was it pretty good from the start or is this version 10 or more?

Oh and whoever thinks this would look better as a streetfighter should hold their head in shame, stupid fucking suggestion!
 
#32 ·
Was it pretty good from the start or is this version 10 or more?
Only one version... what you see is how it was originally designed and built. Its not perfect and there are a few individual parts that could be refined. I have a new design (in CAD) for the wheels that will make them lighter and more modern looking. But if I were to build a second version there is very little I would change in terms of the overall design.

That said, I would like to build a double-sided front swingarm design (true hub-center design) similar to a TESI/Vyrus design.

I should also mention in regards to how well the bike works... when it was finally running and I was doing some track testing, I let a more experienced racer take it out for a few practice laps (Buttonwillow Raceway) and his lap times would have been good enough to put him on the podium in the 450 Superbike class. He really liked the way the bike worked, with possible exception of the front brakes which maybe work a bit too well (tend to be a bit grabby).

I did a lot of homework with the design of this bike... but also probably just got lucky with some of it.
 
#33 ·
I'm now starting to put the bike back together. Frame and both sub-frames have been painted in Champagne metallic. Eventually I will powdercoat the frame, but since I wasn't sure if I'd like this color with the new overall color scheme, I decided to do it with rattle cans. Turned out okay, but not great.

Image

Image

Image


Many people think I used a stock RZ350 frame, but that is not the case. The frame is scratch built using two hoops. The rear swigarm gussets and the engine mount brackets were used from a RZ frame thus causing the confusion as the swingarm gussets are very recognizable. Here are detail pics of the RZ brackets and other brackets on the frame that were scratch build for this bike.

Image

Image

Image

Image

Image

Image

Image


Also had a few bits re-plated in bright zinc. Goal is to have a "factory production" look as opposed to a custom look so nothing fancy with the plating.

Image


Here is the front swingarm. It is made from three castings connected by sheet sections. The castings are hollow and have internal ribs and bosses for suspension bearings. They are very complex on the inside. At a later time I'll try to post pics of the match-boards and core-boxes that were used for making the castings. The one thing that did not go as planned was cleaning the original part. Rather than have it chemically cleaned, I mistakenly had it vibratory cleaned which removed too much of the casting texture and thus it doesn't match the factory Yamaha swingarm on the rear. I have some spares, so someday I'll have another one done correctly for the "factory" look.

Image

Image

Image

Image


A few notes since someone will ask... I did not do the welding on the aluminum parts. I have a guy who is fantastic with welding aluminum, so he gets all my aluminum work. (I just did the crappy welds on the steel parts). "A-N-D Vehicles" logo was imbedded into the match-board casting tool using a zinc plate etching. This was the name of my company from a long time ago.

It is now less than a week before I leave for Portland, so I'll be in a panic to get the bike together this weekend, so not sure if I'll get more photos of the progress... but stay tuned!
 
#38 ·
+1 what blensen said! Not only do you get to keep what you do on your own, but your engineering skills give you knowledge and exposure to manufacturing methods. Also, become an expert in the materials and processes you use to make your motorcycle projects successful and it will help your engineering career. Its a win-win situation.
 
#40 ·
Last week I got the bodywork back form the painter. I had decided to go with a color scheme similar to the original 1985 colors rather that something original. The idea being that I want a factory look. Logos are from RDdecals.com.

The tank is stock RZ500. The tail is custom made starting with a Ducati 916 race replica, then completely reshaping the tail. Tail light in-set is for a Honda F3 tailight (mounted upside down). Front fender started as Honda F2, but then modified to fit my steering upright. Rear fender is 100% custom made. Windscreen started as an aftermarket for Kawasaki Z1000, then duplicated in fiberglass and heavily modified.

Image

Image


the seat foam was shaped in 1/4" and 1/2". Started with paper patterns transferred to the back of the foam. The foam was then rough cut on a band saw and final shaped on disc sander with a very minimal hand sanding to smooth out a few places and clean up the scruff on the edges.

Image


Here are the control rods for steering now re-painted ready for assembly.

Image


the control rods connect via a bell-crank assembly under the tank. Large holes in the bracket allow access of throttle cables and tach cable.

Image

Image


The disc brake carrier was one of the first parts I made. It is machined from a solid chunk of 6061. Rotors are early FZR1000. The rotors float on stainless barrels.

Image

Image


The front axle is fabricated using 4140 (chro-moly). the drive pins are from the back hub of a Honda (NT650) Hawk).

Image

Image


The front caliper is an automotive unit from Performance Machine (Roland Sands dad's company). These have been modified with center spacers that support a floating center pad (double-sided). The ugly grey portion is a heat-sink for the center pad assembly.

Image

Image


The A-arm is fabricated from two CNC machined rails, some thin sheet welded to create the webbed area, and machined block at the front to accept a 12mm ball rod-end.

Image

Image


The front up-right is mainly a sand-casting with a thin sheet welded over the top. There are rib details not visible. I made the wood match-boards used for the casting process. The ball joint is from a Yamaha GTS1000.

Image

Image


Front-end cleaned up and coming together...

Image

Image

Image


The bike is almost completely re-assembled, but this is all I have pictures of right now. Wednesday I leave for Portland and my destination at The One Motorcycle Show this weekend. I'll post more pictures when I return. I'll also try to get photos of the match-boards and core boxes used for the castings as well as some of the raw castings (I had many extra parts made).